使用easyUI展開行詳細編輯form創建CRUD應用
當切換datagrid的view 到 'detailview',用戶可以展開一行顯示一些行的詳細在行下面,這個功能允許你提供一些合適的layout 到里面,編輯form將放置到詳細行panel中,在這個教程中,我們使用datagrid 組件通過編輯form減小占據空間.
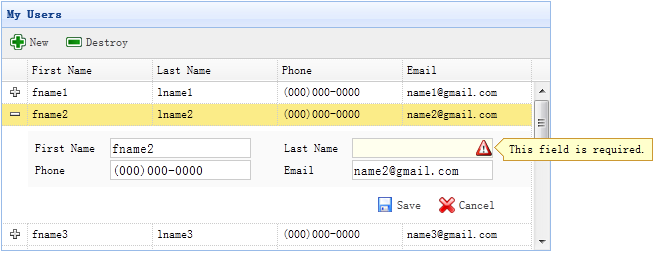
步驟1:使用HTML標記創建 DataGrid
<table id="dg" title="My Users" style="width:550px;height:250px" url="get_users.php" toolbar="#toolbar" fitcolumns="true" singleselect="true">
    <thead>
        <tr>
            <th field="firstname" width="50">First Name</th>
            <th field="lastname" width="50">Last Name</th>
            <th field="phone" width="50">Phone</th>
            <th field="email" width="50">Email</th>
        </tr>
    </thead>
</table>
<div id="toolbar">
    <a href="#" class="easyui-linkbutton" iconcls="icon-add" plain="true" onclick="newItem()">New</a>
    <a href="#" class="easyui-linkbutton" iconcls="icon-remove" plain="true" onclick="destroyItem()">Destroy</a>
</div>
Step 2: 應用detailview到datagrid
$('#dg').datagrid({
    view: detailview,
    detailFormatter:function(index,row){
        return '<div class="ddv"></div>';
    },
    onExpandRow: function(index,row){
        var ddv = $(this).datagrid('getRowDetail',index).find('div.ddv');
        ddv.panel({
            border:false,
            cache:true,
            href:'show_form.php?index='+index,
            onLoad:function(){
                $('#dg').datagrid('fixDetailRowHeight',index);
                $('#dg').datagrid('selectRow',index);
                $('#dg').datagrid('getRowDetail',index).find('form').form('load',row);
            }
        });
        $('#dg').datagrid('fixDetailRowHeight',index);
    }
}); 使用detailview到datagrid,在html頭部引入'datagrid-detailview.js'文件我們使用使用'detailFormatter'函數去生成行詳細內容,在這種情況下,我們返回一個空的<div>,可編輯form將放置到里面,當用戶點擊行展開按鈕('+')
'onExpandRow'事件將被觸發,我們將通過ajax加載編輯form,調用'getRowDetail'方法去得到行詳細容器,所以我們能查找到行詳細panel,創建一個
panel在行詳細中,從'show_form.php'加載編輯form 和返回.
步驟3: 創建編輯Form
編輯form從服務器加載.show_form.php
<form method="post">
    <table class="dv-table" style="width:100%;background:#fafafa;padding:5px;margin-top:5px;">
        <tbody><tr>
            <td>First Name</td>
            <td><input name="firstname" class="easyui-validatebox" required="true"></td>
            <td>Last Name</td>
            <td><input name="lastname" class="easyui-validatebox" required="true"></td>
        </tr>
        <tr>
            <td>Phone</td>
            <td><input name="phone"></td>
            <td>Email</td>
            <td><input name="email" class="easyui-validatebox" validtype="email"></td>
        </tr>
    </tbody></table>
    <div style="padding:5px 0;text-align:right;padding-right:30px">
        <a href="#" class="easyui-linkbutton" iconcls="icon-save" plain="true" onclick="saveItem(<?php echo $_REQUEST['index'];?>)">Save</a>
        <a href="#" class="easyui-linkbutton" iconcls="icon-cancel" plain="true" onclick="cancelItem(<?php echo $_REQUEST['index'];?>)">Cancel</a>
    </div>
</form>
步驟 4: 保存和取消編輯
調用'saveItem'函數去保存一個用戶或者調用'cancelItem'函數取消編輯function saveItem(index){
var row = $('#dg').datagrid('getRows')[index];
var url = row.isNewRecord ? 'save_user.php' : 'update_user.php?id='+row.id;
$('#dg').datagrid('getRowDetail',index).find('form').form('submit',{
url: url,
onSubmit: function(){
return $(this).form('validate');
},
success: function(data){
data = eval('('+data+')');
data.isNewRecord = false;
$('#dg').datagrid('collapseRow',index);
$('#dg').datagrid('updateRow',{
index: index,
row: data
});
}
});
} 決定那一個url提交然后查找form對象和調用'submit'方法提交form數據,當保存數據成功折疊和更新行數據.
function cancelItem(index){
    var row = $('#dg').datagrid('getRows')[index];
    if (row.isNewRecord){
        $('#dg').datagrid('deleteRow',index);
    } else {
        $('#dg').datagrid('collapseRow',index);
    }
}
當取消編輯動作,如果是新行而且還沒有保存,直接刪除行,其他折疊行.
下載EasyUI示例:
easyui-crud-demo.zip 本文由用戶 openkk 自行上傳分享,僅供網友學習交流。所有權歸原作者,若您的權利被侵害,請聯系管理員。
轉載本站原創文章,請注明出處,并保留原始鏈接、圖片水印。
本站是一個以用戶分享為主的開源技術平臺,歡迎各類分享!